
A prepper pantry is a dedicated food reserve that keeps your family fed when the normal supply chain breaks down — whether that’s a winter storm, a job loss, a pandemic, or something worse. The goal isn’t to hoard food. It’s to build a rotating stock of nutritious, shelf-stable food that your family actually eats, organized so nothing expires unnoticed and you’re never caught unprepared.
This guide covers the complete process: setting your target timeline, choosing the right food categories, calculating quantities per person, organizing storage, rotating stock, and building your pantry on any budget. If you’re starting from zero, you can have a functional 30-day supply within 8-12 weeks of normal grocery shopping.
Why You Need a Prepper Pantry
The average American household has about 3-5 days of food on hand at any given time. That’s fine when you can drive to the store whenever you want. It’s a problem when:
- Severe weather keeps you home for 5-14 days (ice storms, hurricanes, blizzards)
- Supply chain disruptions empty store shelves for weeks — we all saw this during COVID-19 in 2020
- Job loss or income reduction means grocery money gets tight for months
- Local emergencies (flooding, chemical spills, civil unrest) make leaving the house unsafe
- Pandemics or quarantines require extended isolation periods
FEMA recommends a minimum 72-hour food supply. Most experienced preppers target 30 days as a baseline, with 90 days as a comfortable cushion. The right target for you depends on your family size, budget, and what risks are most likely in your area.
Step 1: Set Your Target Timeline
Don’t try to build a 6-month pantry overnight. Start with a realistic target and build up:
- 72 hours (3 days): The bare minimum. Focus on ready-to-eat foods that need no cooking — canned soups, crackers, peanut butter, granola bars, bottled water. Budget: $50-75 per person.
- 2 weeks: A solid starter pantry. Add rice, pasta, canned meats, canned vegetables, cooking oil, and basic spices. Budget: $150-200 per person.
- 30 days: The practical sweet spot for most families. You’ll need a full rotation of proteins, carbs, fats, and vitamins. Budget: $300-500 per person.
- 90 days: Serious preparedness. Requires dedicated storage space and a rotation system. Budget: $800-1,200 per person.
These budgets assume you’re building gradually over 2-3 months by adding $20-40 of extra food to your normal grocery trips — not buying everything at once.
Step 2: Calculate Your Calorie Needs
In a survival scenario, the average adult needs 1,800-2,200 calories per day to maintain basic function. Children aged 4-8 need about 1,200-1,400, and teens need roughly the same as adults. Here’s a simple formula for planning:
Daily calories needed = (Number of adults × 2,000) + (Number of children × 1,500)
For a family of 4 (2 adults, 2 kids), that’s 7,000 calories per day, or 210,000 calories for a 30-day supply. That sounds like a lot, but calorie-dense staples like rice (1,650 cal/lb), dried beans (1,550 cal/lb), peanut butter (2,650 cal/lb), and cooking oil (4,000 cal/lb) stack up fast.
Step 3: Stock the Right Food Categories
A balanced prepper pantry covers six categories. Stocking only canned soup and ramen will keep you alive, but the nutritional gaps will cause real problems after two weeks. Here’s what to stock and how much per adult for a 30-day supply:
Grains and Starches (40% of calories)
- White rice — 15-20 lbs (stores 25+ years if sealed properly)
- Pasta (various shapes) — 8-10 lbs
- Rolled oats — 5 lbs
- Flour (all-purpose) — 5 lbs
- Cornmeal — 3 lbs
- Crackers (pilot bread or similar) — 2-3 boxes
Proteins (20% of calories)
- Canned meats (tuna, chicken, spam, corned beef) — 15-20 cans
- Dried beans (pinto, black, kidney, lentils) — 10-15 lbs
- Peanut butter — 3-4 jars (16 oz each)
- Canned beans — 10-12 cans
- Powdered milk — 2-3 lbs
- Freeze-dried meat (if budget allows) — 2-4 lbs
Fats and Oils (15% of calories)
- Vegetable or canola oil — 2-3 liters
- Coconut oil — 1 jar (long shelf life)
- Shortening — 1 can
- Peanut butter (double-counted — it’s both protein and fat)
Fruits and Vegetables (15% of calories)
- Canned vegetables (corn, green beans, peas, tomatoes, mixed) — 20-25 cans
- Canned fruits (peaches, pears, fruit cocktail, applesauce) — 10-12 cans
- Dried fruits (raisins, apricots, cranberries) — 2-3 lbs
- Dehydrated vegetables — 1-2 lbs (if available)
Seasonings, Baking, and Comfort Foods (5%)
- Salt — 2 lbs
- Sugar — 5 lbs
- Baking powder and baking soda — 1 can each
- Honey — 2 lbs (indefinite shelf life)
- Coffee or tea — whatever you drink
- Spices (garlic powder, onion powder, chili powder, cinnamon, pepper)
- Bouillon cubes or powdered broth — 1-2 boxes
- Comfort foods: hot chocolate mix, hard candy, popcorn kernels
Water
- 1 gallon per person per day (drinking + basic cooking)
- 30-day target: 30 gallons per person, 120 gallons for a family of 4
- Store in food-grade containers — NOT in old milk jugs (they degrade)
- Consider a portable water filter as backup
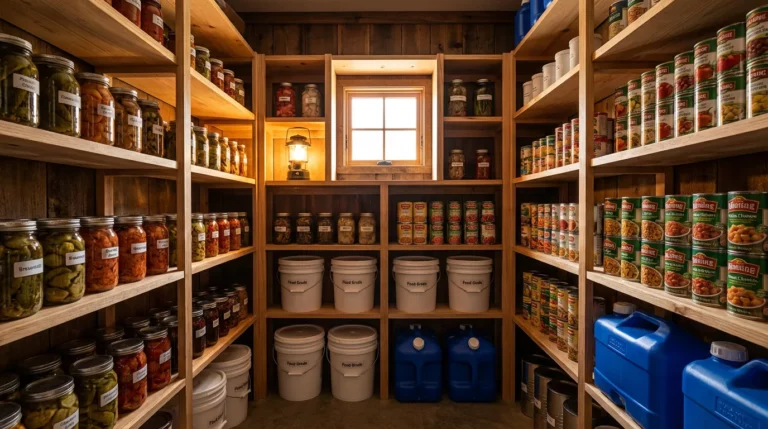
Step 4: Storage Conditions That Matter
Food storage life depends almost entirely on three factors: temperature, moisture, and light. Get these wrong and your 25-year rice becomes a 2-year disappointment.
- Temperature: Store food at 50-70°F (10-21°C). Every 10°F increase above 70°F cuts shelf life roughly in half. A basement is ideal. A garage in Arizona is not.
- Moisture: Keep humidity below 15% for dry goods. Use food-grade buckets with gamma lids, Mylar bags with oxygen absorbers, or vacuum-sealed bags. Never store food directly on a concrete floor — moisture wicks up. Use pallets or shelving.
- Light: UV light degrades nutritional content and breaks down packaging. Store food in opaque containers or in a dark room. Canned goods are fine, but clear jars need a dark shelf or pantry.
Container hierarchy for dry goods (best to worst): #10 cans (commercial) > Mylar bags in food-grade buckets with O2 absorbers > vacuum-sealed bags in buckets > original packaging in sealed totes. If you’re on a budget, 5-gallon food-grade buckets from a bakery (often free) with Mylar bag inserts ($15-20 for a pack of 10) are the best value.
Step 5: Set Up a FIFO Rotation System
FIFO stands for First In, First Out — and it’s the single most important habit for maintaining a prepper pantry. Without rotation, you end up with expired food you won’t eat and wasted money.
The system is simple:
- Label everything with the purchase date using a Sharpie. Write it on the top of every can and the front of every package.
- New stock goes to the back. When you buy new cans of beans, they go behind the existing cans. You pull from the front.
- Cook from your pantry regularly. This is the key — your prepper pantry should feed your family as part of normal meal rotation, not sit untouched until an emergency. Make rice and beans once a week. Use the canned chicken in casseroles. Eat the oats for breakfast.
- Replace what you use. When you pull 3 cans of corn this week, add 3 cans of corn to your next grocery list.
- Quarterly audit: Every 3 months, check dates on everything. Anything within 3 months of expiration gets moved to your regular kitchen and eaten immediately.
A well-rotated pantry means nothing ever expires unused. You’re eating the oldest stock and replacing it with fresh. The food is always ready, always current, and always nutritious.
Step 6: Build on a Budget
You don’t need to spend $1,000 in one trip. Here’s a realistic 12-week build plan adding $25-35 per week to your normal grocery budget:
Weeks 1-4 (Foundation): Rice (20 lbs = ~$12), dried beans (10 lbs = ~$10), canned vegetables (12 cans = ~$10), salt, cooking oil. Cost: ~$40-50.
Weeks 5-8 (Protein and variety): Canned meats (12 cans), peanut butter (4 jars), pasta (10 lbs), oats (5 lbs), canned fruits (10 cans), sugar, flour. Cost: ~$60-80.
Weeks 9-12 (Completion and comfort): More canned goods to fill gaps, spices, honey, coffee/tea, comfort foods, baking supplies, powdered milk. Plus storage containers (buckets, Mylar bags). Cost: ~$60-80.
Total: $160-210 per adult for a 30-day supply, built over 3 months.
Budget hacks that save real money:
- Buy rice and beans in bulk from restaurant supply stores (25-50 lb bags)
- Watch for BOGO canned goods sales at grocery stores — stock up when prices drop
- Ask local bakeries for free food-grade 5-gallon buckets (they get icing and fillings in them)
- Dollar stores carry canned vegetables and fruits at $1.25/can — same brands as the grocery store
- Warehouse clubs (Costco, Sam’s Club) are worth the membership for rice, beans, oil, and canned goods in bulk
Common Mistakes to Avoid
- Storing food you don’t eat. If your family hates lima beans, don’t stockpile lima beans. You’ll never rotate them, they’ll expire, and in a crisis you still won’t want to eat them. Stock what your family actually eats.
- Forgetting water. Food without water is useless. You need water for drinking, cooking (rice and beans both require water), and basic hygiene. A family of 4 needs 120 gallons for 30 days — that’s a lot of space. Plan for it or invest in a gravity water filter as backup.
- No cooking plan. If the power is out, how are you cooking your rice and beans? You need at least one alternative cooking method: a camping stove with fuel, a DIY alcohol stove, a butane burner, or a backyard grill with extra propane.
- All carbs, no nutrition. A pantry of white rice and ramen will keep you alive for 30 days but will leave you feeling terrible. Include proteins (beans, canned meat), fats (oil, peanut butter), vitamins (canned fruits, multivitamins), and fiber.
- No rotation system. The most common pantry failure. People build a beautiful stockpile, then forget about it for 3 years. When they finally check, half of it is expired. FIFO rotation — use it, replace it, repeat.
- Panic buying instead of steady building. Buying 200 cans in one panic trip costs more, gets you worse selection, and usually happens when everyone else is also panic buying (so shelves are half empty). Steady weekly additions over 3 months cost less and get you better variety.
Sample 7-Day Meal Plan from a Prepper Pantry
To prove this works in practice, here’s what a week of meals looks like using only shelf-stable pantry food:
| Day | Breakfast | Lunch | Dinner |
|---|---|---|---|
| Mon | Oatmeal with raisins and honey | Peanut butter on crackers, canned peaches | Rice and beans with canned tomatoes |
| Tue | Pancakes (flour, powdered milk, oil) | Canned chicken salad on crackers | Pasta with canned meat sauce |
| Wed | Oatmeal with dried apricots | Canned soup with crackers | Lentil stew with canned vegetables |
| Thu | Cornmeal mush with sugar and powdered milk | Tuna on crackers, canned fruit cocktail | Rice with canned black beans and corn |
| Fri | Oatmeal with peanut butter and honey | Spam and crackers, canned pears | Pasta with canned vegetables and oil |
| Sat | Pancakes with applesauce | Bean soup (dried beans, bouillon, spices) | Rice with canned corned beef and green beans |
| Sun | Oatmeal with dried cranberries | Peanut butter and honey on crackers | Chili (canned beans, canned tomatoes, spices) |
Every meal above uses only pantry staples. No refrigeration needed. Calories range from 1,800-2,200 per adult per day depending on portions. For the full picture on emergency cooking methods, check out our guide on cooking during a blackout and our pantry recipes collection.
Frequently Asked Questions
How much does a 30-day prepper pantry cost?
For one adult, expect $160-210 if you build gradually over 2-3 months by adding $25-35 per week to your regular grocery budget. Buying everything at once costs more because you miss sales and pay retail on everything. For a family of 4, a 30-day supply runs $500-700 built over 12 weeks.
What foods last the longest in a prepper pantry?
White rice (25+ years in Mylar with O2 absorbers), honey (indefinite), salt (indefinite), sugar (indefinite), dried beans (25+ years sealed), freeze-dried foods (25-30 years), and hard wheat berries (30+ years). Canned goods typically last 2-5 years past the printed date when stored in cool, dry conditions.
Should I buy freeze-dried food or stock regular grocery items?
Start with regular grocery items — they’re cheaper, you already know you like them, and they rotate naturally into your daily meals. Freeze-dried food (Mountain House, Augason Farms) makes sense as a supplement once your basic pantry is established, especially for long-term storage beyond 5 years. A mix of both is ideal.
How much space does a 30-day pantry need?
For one adult, roughly 15-20 square feet of shelving (a single wire shelving unit from Costco or Home Depot). For a family of 4, two to three shelving units or about half a closet. The water is the space hog — 120 gallons for a family of 4 takes up about 16 cubic feet.
Do I need special containers, or can I use the original packaging?
For short-term storage (under 1 year), original packaging is fine. For anything beyond that, transfer dry goods (rice, beans, flour, oats) to Mylar bags with oxygen absorbers inside food-grade 5-gallon buckets. This protects against moisture, pests, and oxidation. Canned goods are already sealed — just keep them cool and dry.
Bottom Line
Building a prepper pantry isn’t complicated and doesn’t require a big upfront investment. Buy an extra $25-35 of shelf-stable food each week, store it properly, rotate through it as part of normal cooking, and within 3 months you’ll have a 30-day food supply that your family can live on if things go sideways. Start this week — even $20 of extra rice and canned goods puts you ahead of 90% of households.
For a broader view of emergency readiness, see our complete emergency survival checklist and our guide to building a family emergency plan.
Dan Lockland is a preparedness instructor and survival skills educator with over 15 years of hands-on experience. He shares practical, no-nonsense guidance on emergency preparedness, self-reliance, and sustainable living at PreparingWithDan.com.