
When the power goes out and the gas stove stops working, a family of 4 still needs to eat. Most emergency cooking solutions cost $50–$200 and require fuel canisters that run out. A soda can alcohol stove costs almost nothing, runs on denatured alcohol you can buy at any hardware store for $10 a quart, and weighs less than a quarter. I have made dozens of these over the years — they have cooked meals for my family during multi-day outages, served as camp stoves on backpacking trips, and lived in my bug-out bag as a backup heat source.
This guide gives you the complete build: exact dimensions, which design works best, how to use it safely, and what fuel to buy. You will have a working stove in 30 minutes.
What You Need
The materials list is short. Everything except the alcohol can be found in a kitchen junk drawer:
| Item | Where to Get It | Cost | Notes |
|---|---|---|---|
| 2 aluminum soda cans | Recycling bin | Free | Standard 12 oz cans; Coke, Pepsi, any brand works |
| Denatured alcohol (fuel) | Hardware store (paint aisle) | ~$10/qt | Klean Strip brand common; a quart lasts many uses |
| Thumbtack or nail | Home | Free | For punching the jet holes |
| Marker pen | Home | Free | For marking cut lines |
| Scissors or utility knife | Home | Free | Scissors work fine; knife gives cleaner cuts |
| Coin (nickel or quarter) | Free | Used as a depth guide for measuring cuts |
Optional but recommended: a piece of aluminum foil (12”×12”) for a windscreen, and a small pot stand (three large metal binder clips or a wire trivet).
Understanding the Design
Before you start cutting, understand what you are building. A soda can alcohol stove is a pressurized side-burner stove. It works like this:
- You pour a small amount of alcohol into the center of the stove
- You light it — the initial flame is a “primer burn” on top of the center port
- The flame heats the alcohol inside, which vaporizes and builds pressure
- The pressurized vapor exits through the small jets around the rim and burns as a consistent flame ring
- You rest your pot on a stand above the flame ring
This pressurized design (called a “Pepsi can stove” or “penny stove” in the ultralight backpacking community) is more efficient than a simple open-top stove. It takes about 60 seconds after lighting to reach full pressure and optimal flame.
Step-by-Step Build Instructions
Step 1: Mark Your Cut Lines
You need the bottom sections of both cans — about 1 inch (25mm) tall for each half. Use a marker and a book or box as a guide to draw a consistent line around each can at the 1-inch mark. A dime stands at about 0.7 inches; a nickel at about 0.8 inches. Stack coins or use a small box to hold your marker at the right height and rotate the can against it.
Mark both cans at the same height. Consistency matters here — if the two halves are different heights, they will not press together cleanly.
Step 2: Cut the Cans
Cut along the line you marked. Two methods:
- Scissors method: Poke a small hole with a nail or pin at the cut line, then insert scissors and cut around the can. This is slower but requires no special tools.
- Knife method: Score around the can repeatedly with a utility knife at the mark, gradually deepening the cut until the bottom separates. Gives a cleaner edge.
After cutting, press the cut edge down against a hard surface to flatten any rough burrs. You want both cut edges to be as smooth and flat as possible so the halves press together evenly.
Step 3: Punch the Jet Holes
Take the top can half (the one that will become the outer shell) and punch a ring of small holes around the side wall, about 3mm from the top rim. Use a thumbtack or small nail. Space the holes evenly — 16 to 20 holes around the circumference. These are the jets that will produce your flame ring.
Also punch 1 hole in the very center of the bottom of this top half. This is the center fill port — where you pour in the alcohol and where the initial primer flame burns.
Step 4: Press the Halves Together
Now you need to fit the two halves together. The inner half goes inside the outer half. The challenge: both can bottoms are exactly the same diameter, so they do not naturally slide together.
The trick: make small vertical cuts (4–6 cuts, each about 5mm deep) around the rim of the inner half. These cuts allow the inner rim to compress slightly and slide into the outer shell. Press firmly until the two bottoms are flush. You want a tight, snug fit with no gap around the rim — this is what creates the pressure chamber inside.
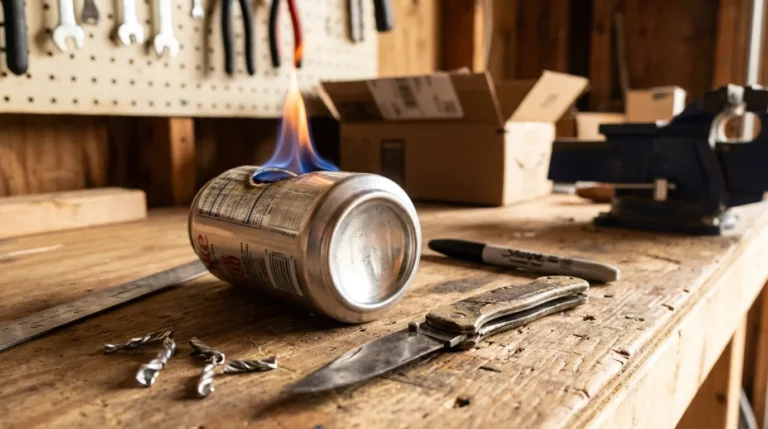
When pressed together correctly, the stove looks like a small puck about 1 inch tall. The jet holes should be visible around the upper edge, and the center fill port should be centered on top.
Step 5: Test Before Using
Before your first use, do a quick pressure test outdoors: pour a small amount of alcohol (about 1 tablespoon) into the center fill port. Light it with a long lighter. Watch for the primer flame on top for about 30–60 seconds, then observe whether the flame shifts to the side jet holes as the stove pressurizes. A working stove produces a ring of small, steady blue-orange flames around the rim.
If only the center burns and the jets never ignite, your jet holes may be too large (pressure is leaking) or the two halves have a gap (no pressure builds). Inspect the rim joint and re-press the halves tighter.
Building a Pot Stand
The stove alone is not enough — you need a way to hold a pot above the flame without smothering it. Three options:
- Three large binder clips: Unfold three large metal binder clips, arrange them as a tripod around the stove at pot height. This is the ultralight backpacker solution. Free, weighs nothing.
- Aluminum foil windscreen as pot stand: Fold a strip of heavy-duty aluminum foil into a channel that both blocks wind and holds the pot. Many preppers use this combination.
- Small wire trivet: A $5 camping pot stand from REI or Amazon. Cleaner and sturdier if you are using this regularly.
The pot should sit roughly 1–2 inches above the stove top. Too close smothers the flame; too far wastes heat.
Fuel Guide: What to Buy and What to Avoid
Fuel choice significantly affects how well this stove performs:
| Fuel | Where to Buy | Performance | Cost | Verdict |
|---|---|---|---|---|
| Denatured alcohol | Hardware stores, Lowe’s, Home Depot | Best — burns hot, pressurizes quickly | ~$10/qt | ✅ First choice |
| HEET Yellow Bottle | Gas stations, auto parts stores | Very good — essentially methanol | ~$3/12oz | ✅ Excellent emergency fuel |
| Isopropyl alcohol (91%+) | Pharmacy, grocery stores | Works but burns cooler, slower | ~$4/16oz | ⚠️ Acceptable if nothing else available |
| Isopropyl alcohol (70%) | Pharmacy | Poor — 30% water limits combustion | ~$3/16oz | ❌ Avoid — weak flame, slow boil |
| Everclear grain alcohol (190 proof) | Liquor store | Good performance, food-safe | ~$25/750ml | ⚠️ Works well but expensive |
For your emergency kit: store a quart of denatured alcohol in a sealed metal container alongside the stove. HEET Yellow Bottle is the best secondary option because it is available at every gas station in North America.
Using the Stove Safely
Alcohol stoves have real risks. Unlike propane stoves, the flame from burning alcohol is nearly invisible in daylight. You may not be able to see whether the stove is lit. Take these precautions seriously:
- Always use outdoors or in very well-ventilated spaces. Burning alcohol produces carbon monoxide. Never use inside a tent, car, or enclosed room.
- Never add fuel to a hot or burning stove. Alcohol vapor is invisible and highly flammable. Pour fuel only when the stove is cold and completely extinguished.
- Use a long lighter or matches — not a standard cigarette lighter with your hand close to the stove.
- Set the stove on a non-flammable, stable surface. A rock, concrete, or a piece of sheet metal. Not a picnic table, not dry leaves, not a plastic cutting board.
- Keep children back from the stove while lit. Explain that the invisible blue flame is real and hot. This is not optional.
- To extinguish: Cover the stove with a non-flammable cap (a small tin lid, a rock) to cut off oxygen. Do not blow it out — that can send burning alcohol vapor into your face.
Building a Windscreen
Wind is the biggest enemy of alcohol stove efficiency. Without protection, a 10 mph breeze can double your boil time or prevent the stove from pressurizing at all. A simple windscreen is essential:
- Heavy-duty aluminum foil: Cut a strip about 12 inches tall and long enough to wrap around your pot with a few inches of overlap. Fold or crimp the bottom edge to create stability. Punch a few small holes at the bottom edge to prevent heat buildup that could damage the stove (you want airflow at the base).
- Emergency mylar blanket: Cut a piece and wrap it around your cooking setup. Reflective surface bounces heat back toward the pot.
- Terrain: Use rocks, your pack, or a vehicle to block the wind direction. Combine with a foil screen for best results.
A windscreen typically reduces boil time by 30–50%. For a family-sized 2-liter pot, the difference between 12 minutes and 6 minutes of fuel burn is significant.
What This Stove Can and Cannot Do
Set realistic expectations. A soda can stove is good at a few specific things and inadequate for others:
Good for:
- Boiling water for coffee, instant oatmeal, ramen, rehydrated freeze-dried meals
- Heating soups and stews from cans
- Light sauteing in a small pan
- One- or two-person meals
Not suited for:
- Cooking large family meals from scratch (too small, too slow)
- High heat searing or frying
- Use in high wind without a windscreen
- Cooking multiple dishes simultaneously
For a family of 4, I treat this stove as a backup — for boiling water for instant meals when the primary camp stove is unavailable. My main emergency cooking setup is a propane camp stove with 6 extra canisters. The alcohol stove goes in the go-bag and costs nothing.
Common Mistakes Building and Using Soda Can Stoves
1. Jet holes that are too large
The most common build mistake. Large holes prevent the stove from building the internal pressure that produces efficient jet flames. The stove runs as a low-efficiency open-top burner instead. Use a thumbtack, not a nail. If you accidentally made holes too large, start with a new can half — you cannot fix holes that are too big.
2. A loose rim joint between the two halves
If the inner and outer halves do not press together tightly, the stove loses pressure through the rim gap and never produces proper jets. The primer flame burns but jets never appear. Make the vertical relief cuts shallower or use fewer of them so the inner rim stays tighter. You want a press fit that requires moderate force to assemble.
3. Refueling while the stove is still warm
The biggest safety mistake. The stove looks extinguished, but residual heat can flash-ignite fresh alcohol instantly. Wait at least 5 minutes after the visible flame goes out before adding fuel. Always pour fuel from a small container with a defined pour, not directly from a large bottle.
4. No windscreen
Using this stove outdoors without wind protection means highly variable performance and wasted fuel. An aluminum foil windscreen takes two minutes to make and dramatically improves both efficiency and reliability. Do not skip it.
5. Using isopropyl 70% when better options are available
Drugstore 70% isopropyl is 30% water. It burns, but weakly and slowly. If your stove seems underpowered, your fuel is probably the problem. Switch to denatured alcohol or HEET yellow bottle before assuming the stove is defective.
FAQ
How much fuel does this stove use per boil?
About 1 oz (2 tablespoons) of denatured alcohol will boil 2 cups of water in 5–8 minutes with a windscreen. A quart bottle of denatured alcohol contains about 32 oz of fuel — enough for roughly 30 boils. For a family of 4 using this for breakfast and dinner heating, a quart of fuel covers about 2 weeks of emergency use.
Is this stove safe to use in a power outage at home?
Use it outdoors or in a garage with the door open — not inside the house. Even in an emergency, burning any fuel indoors (alcohol, propane, wood) produces carbon monoxide and creates fire risk. During a power outage in cold weather, opening a door or window briefly to cook is safer than using an open flame indoors. If you must cook inside, use a Sterno-type canned heat product in an extremely well-ventilated space and place a battery-operated carbon monoxide alarm nearby.
How long does a soda can stove last?
A well-built soda can stove can last years with proper storage. The limiting factors are the aluminum deforming from heat over many uses (50+ uses) and the rim joint loosening over time. Keep a spare can half or build two stoves — the materials are free. For a go-bag, rebuild or inspect the stove annually as part of your regular rotation.
Can kids help build this?
The building process involves cutting aluminum with scissors and poking holes with a thumbtack — fine for kids 10 and up with adult supervision. The stove use itself requires adult supervision at all times. The nearly invisible flame is the main hazard; make sure kids understand it is lit even when they cannot see the flame clearly.
Bottom Line
A soda can alcohol stove is not a luxury camping item or a clever trick — it is a genuinely useful emergency tool that costs essentially nothing and takes 30 minutes to build. Two soda cans from the recycling bin, a thumbtack, some scissors, and a quart of denatured alcohol from the hardware store. That is the entire setup.
Build one this weekend. Put it in your go-bag with a small bottle of HEET. Make a foil windscreen, find three binder clips for a pot stand, and do a test boil in the backyard so you know it works before you need it. The whole project takes an hour, costs under $15 for the fuel, and gives you a reliable backup cooking source that works when everything else fails.
Dan Lockland is a preparedness instructor and survival skills educator with over 15 years of hands-on experience. He shares practical, no-nonsense guidance on emergency preparedness, self-reliance, and sustainable living at PreparingWithDan.com.