
Most families own smoke detectors. Most have fire extinguishers. Almost none have run a timed fire evacuation drill with their kids in the last 12 months. The gap between having safety equipment and actually knowing how to use it — in the dark, under stress, with children who may panic — is practice. Children who have rehearsed emergency procedures respond faster and with less fear than children who haven’t. That’s the entire point of drills.
This guide covers how to run effective emergency drills with children, calibrated to age, without creating anxiety, and with the specific procedures your family should actually practice.
Why Drills Work (and Why Most Families Skip Them)
The research on drills is consistent: children who have practiced emergency procedures are significantly calmer and more effective in actual emergencies. A well-designed drill does three things:
- It converts knowledge into muscle memory. Knowing you should low-crawl under smoke and knowing how to do it quickly in the dark are different things.
- It reveals problems before they become emergencies. Your first fire drill will show you that the window won’t open from the inside, or that your 6-year-old can’t reach the door handle, or that no one knows where the meeting spot is. Better to find this out during a drill.
- It builds competence, which reduces fear. Children who feel capable in an emergency are less frightened than children who have only been told that emergencies are scary.
Most families skip drills because they’re awkward to run, they don’t know how often to do them, and they’re worried about scaring young children. This guide addresses all three concerns.
The Annual Drill Schedule
| Drill Type | Frequency | Best Season/Timing |
|---|---|---|
| Fire evacuation (home) | Every 6 months | Change your clocks, test your drills (same day as smoke detector battery check) |
| Fire — nighttime variation | Once per year | A surprise drill at night tests the most realistic scenario |
| Earthquake (drop/cover/hold on) | Quarterly | 30 seconds, can be done at the dinner table |
| Tornado / severe weather shelter | Once per year | Severe weather season for your region |
| Communication plan rehearsal | Once per year | Any time — pick a Saturday and make it intentional |
Fire Evacuation Drill
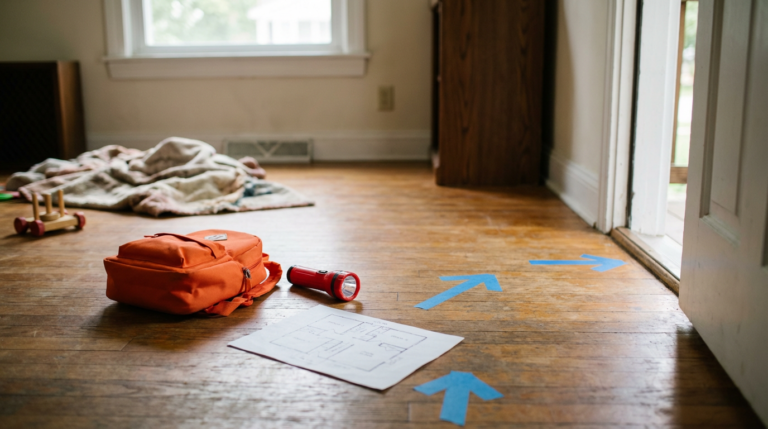
Before the Drill: Draw the Escape Map
Sit down as a family and draw a floor plan of your home. Mark two exit routes from every bedroom. Mark the family meeting spot (a specific spot outdoors — the mailbox, the corner of the yard, a neighbor’s driveway — not a vague “outside”). Post this map on the back of bedroom doors.
Running the Drill
- Announce you’re doing a fire drill. Press the test button on a smoke detector to start it sounding.
- Everyone follows their exit route to the meeting spot. Adults time it.
- Everyone checks in at the meeting spot. Designate one parent to account for all children before anyone goes back inside.
- Discuss: What was slow? What was confusing? What needs to change?
Target time for a family of 4 to evacuate and check in at the meeting spot: under 3 minutes. USFA data indicates children have approximately 3 minutes to exit safely before smoke conditions become dangerous in a typical house fire.
The Nighttime Drill (Once Per Year)
Most children sleep through or are disoriented by smoke alarms at night. Once per year, do the drill as a surprise at night — not the middle of the night, but after dark, when children are in their rooms. This tests: do they wake up? Do they remember to stay low? Can they find the door and test it without opening if it’s hot?
Fire Safety Skills to Practice Alongside the Drill
- Stop, drop, and roll: Practice the physical motion. “Stop immediately, drop to the ground, cover your face with your hands, roll until the fire is out.”
- Get low and go: Practice crawling to an exit under a pretend smoke line. In real smoke, the breathable air is at floor level.
- Door check before opening: Touch the door — back of the hand to the door and door handle. If hot, use the second exit route or signal from the window.
- Once out, stay out: Under no circumstances does anyone go back in for anything, including pets. This decision is made in advance, not in the moment.
Earthquake Drill (Drop, Cover, Hold On)
The correct earthquake response takes less than 5 seconds to explain and 30 seconds to practice:
- Drop to your hands and knees immediately.
- Cover your head and neck with one arm and hand. If under a sturdy desk or table, get under it.
- Hold on until shaking stops. If under furniture, hold on with one hand and be ready to move with it. Do not try to run out of the building during shaking.
Practice this at the dinner table every quarter — it takes 30 seconds. Say “earthquake drill” and have everyone execute the procedure. Young children find this funny; that’s fine. The physical motion is what matters.
Tornado / Severe Weather Drill
Designate the Safe Room in Advance
Your tornado shelter is: the lowest floor, interior room, as far from windows as possible. In most homes this is a basement, an interior bathroom, a closet, or a hallway. Walk every family member to this room and confirm everyone knows where it is before any severe weather season.
Running the Drill
From wherever family members are in the house, practice moving to the safe room in under 60 seconds. Bring shoes — shattered glass is a serious post-storm hazard. Have a weather radio in the safe room or a plan for monitoring alerts without internet access.
If you have a NOAA weather radio (Midland WR400, ~$50), this is the time to show children what its alarm sounds like and what it means. Practice the response: hear the alarm, turn on the radio, confirm the threat, move to the safe room.
Family Communication Plan Rehearsal
The communication plan rehearsal is different from a physical drill — it’s a knowledge check and practice session. Once per year, run through these questions with every family member old enough to answer:
- What is our out-of-area contact’s phone number? This person lives in a different city. In a local emergency, local circuits are often congested. An out-of-area contact serves as a relay station — everyone calls them, they relay messages to other family members. Children who can use a phone should be able to say this number from memory.
- What are our two rally points? Near rally point (specific spot near home) and far rally point (a specific location 5–15 miles away). Children should know both.
- What do you do if you’re at school and parents can’t be reached? Know the school’s emergency release procedure. Know which adults are authorized to pick up each child.
- If you’re separated from the family and can reach a phone, who do you call first? Mom, Dad, and out-of-area contact — in what order, at what numbers.
Age-by-Age Guidance
| Age Range | What They Can Learn | How to Practice It |
|---|---|---|
| Ages 3–5 | Basic fire response (stop/drop/roll), family meeting spot, parent’s first name | Make it a game; repeat often; keep it simple and positive |
| Ages 6–9 | Escape routes, earthquake procedure, out-of-area contact name (not necessarily number) | Have them show you the escape route; practice Drop-Cover-Hold On at meals |
| Ages 10–13 | Full communication plan, all drill procedures, basic first aid | Give them real responsibilities in the drill — timekeeper, account-taker at the meeting spot |
| Ages 14+ | Everything above plus how to respond if separated, how to reach help | Brief them fully and treat concerns seriously; give them meaningful roles |
Handling Fear and Anxiety
The goal of a drill is to build competence, and competence reduces fear. Some additional principles:
- Frame drills around capability, not danger. “We’re practicing so you know exactly what to do” is better than “in case something terrible happens.” The emphasis is on what the child can do, not what could happen to them.
- Don’t tell young children more than they need to know. A 4-year-old doesn’t need a detailed explanation of how house fires spread. They need to know: when you hear the loud noise, go here.
- Your affect during the drill sets the tone. If you’re calm and matter-of-fact, children are calm. If you’re visibly anxious, they’re anxious. Practice your own calm delivery before running a drill with children.
- After a drill, debrief positively. Acknowledge what went well before discussing what to improve. “You remembered to stay low — that was exactly right. Next time let’s see if we can do it even faster.”
Common Mistakes
- Fire escape plan that exists only in an adult’s head. If the map isn’t posted in bedrooms and the children haven’t walked the routes, the plan doesn’t exist for the people who need it most. Post it. Walk it.
- Meeting spot that’s “outside somewhere.” When family members are separated or stressed, “outside” produces confusion. The meeting spot must be a specific, named location. A specific address, a specific landmark, something unambiguous.
- Communication plan that assumes cell service works. In a local emergency, cell networks often congest. The out-of-area relay contact and physical rally points are how the plan functions when cell doesn’t. Children need to know the out-of-area contact number — not just that one exists.
- Never doing a night drill. Most home fire fatalities occur at night. The daytime drill when everyone is alert and awake is useful but incomplete. At least once, test the scenario that’s actually most dangerous.
- Forgetting to update the plan as the family changes. A plan written when children were under 5 needs updating when they’re 10. Schools change, authorized pickup people change, phone numbers change. Review annually.
FAQ
At what age should I start doing emergency drills with my children?
Age 3 is not too young for simple fire response (stop/drop/roll) and knowing the family meeting spot. The complexity scales with age. A 3-year-old practices “when I hear the loud noise, go to the mailbox.” A 10-year-old practices the full communication plan including out-of-area contacts. Start early and build complexity gradually.
How do I run a drill without terrifying a young child?
Frame it as a game or a challenge, not a warning. Use your calm, matter-of-fact voice. Emphasize what they’re capable of doing correctly. Don’t explain in graphic detail what happens if they don’t do it right. Children learn competence, not catastrophe. After every drill, tell them specifically what they did well.
How do I coordinate with my child’s school on emergency plans?
Schools typically have written emergency plans available to parents on request. Ask specifically about: (1) how students are released to parents/guardians during an emergency, (2) what documentation you need to bring to pick up your child, (3) where the emergency pickup point is if the school is inaccessible, and (4) what the protocol is if your authorized pickup person can’t reach the school. Know these procedures before you need them.
What if my child has a disability or special needs that makes standard drill procedures difficult?
Consult with your child’s school about their individualized safety plan — most schools are legally required to have one. At home, adapt procedures to your child’s capabilities: practice the specific sensory experience of smoke alarms for children who are sensitive to sound, create a visual escape route map for children who are visual learners, and ensure that any adult or older sibling who might be in the home knows the adapted procedures. The goal is a plan that works for your actual child, not a generic template.
Bottom Line: A family emergency drill program requires a drawn escape map posted in bedrooms, two identified exit routes per bedroom, a specific outdoor meeting spot, an out-of-area contact number that every child who can use a phone has memorized, and timed practice twice per year for fire and annually for the communication plan. The entire setup takes one afternoon. The practice takes 15–20 minutes twice a year. Children who have done this respond better in real emergencies. That’s the whole point.