
A family of 4 uses about 400 gallons of water per day. When a municipal water system fails — pipe break, contamination event, drought restriction, or extended power outage that knocks out the water pumping station — that supply disappears. Most families have zero stored water. The ones who do have 72 hours of bottled water at best. A rainwater collection system changes that equation: a 1,000-gallon cistern fed from your rooftop gives you 2–3 weeks of non-drinking water for a family of 4, and with proper filtration, it becomes a legitimate drinking water source.
This guide covers everything you need to build a functional system: the legal landscape, sizing calculations, equipment options with costs, installation steps, and water quality management.
Legal Rules: Check Your State First
Before buying anything, verify what is legal in your state. The rules vary more than most people expect:
| State Category | Examples | Rules |
|---|---|---|
| Unrestricted / encouraged | California, Texas, Washington, Florida, Oregon, Virginia | No limits on collection volume; some offer tax incentives or rebates |
| Limited collection allowed | Colorado (110 gallons / 2 barrels), Utah (2,500 gallons with registration) | Specific volume caps; registration or permit may be required |
| Mostly unrestricted, check local codes | Most other states | State law allows collection but local municipality may have additional rules |
| Check HOA rules separately | Any HOA community | HOAs may restrict visible rain barrels; some states limit HOA ability to prohibit systems |
The short version: rainwater harvesting is legal in virtually every US state, but volume limits, permit requirements, and HOA rules vary. Search “[your state] rainwater harvesting laws” — most state environmental agencies publish clear guidance online. Do this before buying equipment.
Sizing Your System for a Family of 4
The right system size depends on two questions: what are you using the water for, and how long do you want to be able to sustain that use?
Water use by purpose for a family of 4:
- Toilet flushing: 60–80 gallons/day (standard toilets) or 25–40 gallons/day (low-flow)
- Laundry: 15–40 gallons per load, 8–12 loads per week = 17–70 gallons/day
- Garden irrigation: 1–2 gallons per square foot per week (highly variable)
- Drinking and cooking: 1 gallon per person per day = 4 gallons/day minimum
- Full household non-potable use: 150–250 gallons/day
Sizing recommendation for emergency preparedness:
- Minimum (30-day water security): 500–1,000 gallons of storage, used for toilet flushing and basic sanitation only during an emergency
- Practical (garden irrigation + laundry supplement): 1,000–2,500 gallons
- Comprehensive (year-round significant reduction in municipal use): 2,500–10,000+ gallons
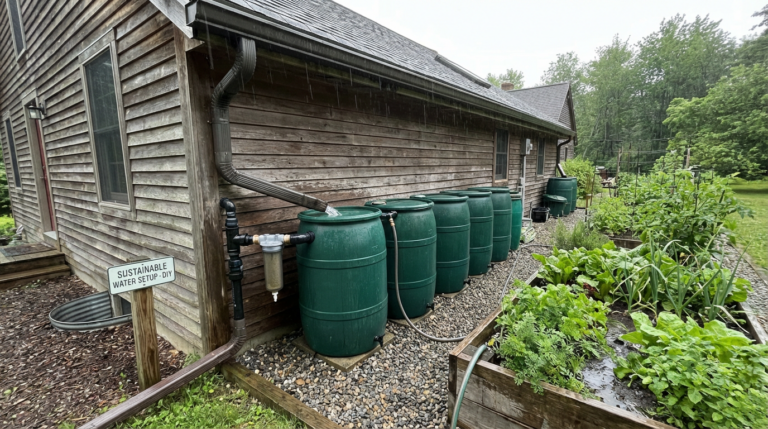
Equipment Options: Rain Barrels vs. IBC Totes vs. Cisterns
| Option | Capacity | Cost | Best For | Drawbacks |
|---|---|---|---|---|
| Rain barrel (55 gal) | 55 gallons | $30–$100 each | Starter system, small gardens | Very limited storage; need many for meaningful capacity |
| Linked rain barrels | 110–330 gallons | $100–$300 total | Moderate garden use | Still limited; overflow management needed |
| IBC tote (275–330 gal) | 275 or 330 gallons | $50–$200 each (used) | Best value for volume | Ugly; requires food-grade or food-safe tote; UV stabilization needed |
| Polyethylene cistern | 500–10,000 gallons | $500–$3,000+ | Serious long-term storage | Expensive; requires professional installation for large sizes |
| Underground cistern | 1,000–50,000 gallons | $2,000–$20,000+ | Maximum storage, hidden | Expensive excavation; requires permits; professional installation |
The best value for most families: 2–4 used IBC totes ($50–$150 each) gives you 550–1,320 gallons of storage for $100–$600. Used food-grade IBC totes (formerly used for food ingredients, juices, or water) are widely available on Craigslist, Facebook Marketplace, and from food/beverage distributors. Avoid totes that held chemicals, pesticides, or industrial products — the plastic absorbs contaminants that cannot be cleaned out.
System Components and How They Work Together
1. Collection Surface: Your Roof
Most residential rainwater systems collect from rooftops. The roofing material affects water quality:
- Metal roofing (standing seam, corrugated): Best for water collection. Minimal contamination, efficient runoff.
- Concrete or clay tile: Good. Some mineral pickup but generally clean.
- Asphalt shingles: Acceptable for non-potable use; contains trace hydrocarbons and zinc. Not ideal for drinking water without robust filtration. This is the most common US residential roofing material.
- Wood shake: Avoid if possible — organic material, potential for bacteria, tannins.
- Painted or coated metal: Check paint type; some older lead-based paints are a concern.
2. Gutters and Downspouts
Standard 5-inch K-style aluminum gutters work fine. Clean them before setting up the system and install gutter guards to reduce debris load. Your downspout is where the collection system connects.
3. First Flush Diverter
This is the most important water quality component of a basic system. The first flush diverter captures and discards the first portion of rain runoff, which contains the highest concentration of bird droppings, debris, dust, and rooftop contamination. After the first flush chamber fills, cleaner water flows through to storage.
DIY first flush diverter: A section of 4-inch PVC pipe installed vertically in the downspout line. A rubber ball inside the pipe seals the bottom when the chamber fills, redirecting subsequent flow to the storage tank. Size the chamber at about 1 gallon per 100 sq ft of roof. Commercial first flush diverters cost $30–$80 at irrigation suppliers.
4. Inlet Screen and Overflow
Every storage container needs a fine screen (window screening works) over the inlet to block insects, debris, and light (prevents algae). Every storage container also needs an overflow outlet that directs excess water away from your foundation — during heavy rain, a properly sized roof can overwhelm even a 1,000-gallon tank quickly.
Step-by-Step Installation for a Basic IBC Tote System
This is the most cost-effective setup for a family wanting meaningful emergency storage:
What You Need
- 1–2 food-grade IBC totes ($50–$150 each used)
- First flush diverter kit ($30–$80) or 4” PVC fittings ($20) to DIY
- Flexible downspout extension or diverter valve ($15–$25)
- 1” or 1.5” ball valve for the tote outlet (usually already on IBC totes)
- Garden hose adapter for the outlet valve
- Fine mesh screen material ($10)
- Concrete blocks or cinder blocks for elevation (allows gravity-feed to a hose)
Installation Steps
- Choose location: Position the tote under a downspout on level ground (or elevated on cinder blocks). Elevating the tote 12–18 inches above ground gives you gravity pressure through the outlet hose — about 0.4–0.7 PSI, sufficient for garden hose flow but not pressure-demanding uses.
- Install the first flush diverter: Connect it inline at the downspout before the tote inlet. Most DIY versions use a vertical PVC pipe section with a rubber ball check. Commercial kits have clear instructions.
- Connect the downspout to the tote: Use a flexible downspout extension or a dedicated inlet fitting to route water into the tote opening. Keep the inlet elevated to prevent backflow.
- Screen every opening: Cut window screening to size and secure with zip ties or hose clamps over the inlet hole, overflow pipe, and any other openings.
- Install overflow pipe: Drill or cut a hole near the top of the tote wall, install a bulkhead fitting, and route the overflow away from the house foundation using a section of hose or pipe directed to a drainage area.
- First-use flush: After the first rain, let the system fill and then drain completely through the outlet. This flushes any remaining residue from the tote interior. Refill and use normally after that.
Connecting Multiple Totes
Connect two IBC totes in series by running a 1” pipe from the outlet valve of the first tote to the inlet of the second. Both totes fill and drain together. This doubles your storage capacity for the cost of one additional tote and a few feet of pipe. For large systems (3+ totes), a manifold arrangement is more practical than series connection.
Water Quality and Filtration
For Non-Potable Uses (Garden, Toilet Flushing, Laundry)
No additional treatment needed beyond the first flush diverter and screens. This water is fine for gardens (plants are not sensitive to the trace contaminants in roof runoff), toilet flushing, and in many cases laundry.
For Drinking and Cooking
If you want to use rainwater for drinking, you need treatment. A three-stage approach handles the main concerns:
- Sediment pre-filter (5–20 micron): Removes particulates, reduces turbidity. $20–$50 inline filter.
- Activated carbon filter: Removes organic compounds, improves taste and odor, removes trace chemicals from roof runoff. Standard under-sink carbon filter, $30–$80.
- UV purification or boiling: Kills bacteria, viruses, and protozoa. UV systems ($80–$150) work with electricity. In an outage, boiling for 1 minute is effective (3 minutes above 6,500 ft elevation).
A Berkey gravity filter ($250–$380) replaces all three stages with no electricity, making it the best option for emergency drinking water filtration — from any source, including rainwater.
Winter Preparation
In freezing climates, water in PVC pipes and totes expands and cracks. Before the first hard freeze:
- Drain totes completely (open the outlet valve, disconnect the downspout)
- Blow out or drain any connecting pipes
- Disconnect and store flexible hoses indoors
- Leave outlet valves open so any residual water drains rather than freezes
Common Mistakes in Rainwater System Setup
1. Skipping the first flush diverter
The first rain after a dry spell washes two to four weeks of bird droppings, dust, pollen, and atmospheric particles off your roof. Without a first flush diverter, all of that goes directly into your storage tank. A $50 component prevents months of bacteria buildup. Do not skip this.
2. Buying rain barrels when IBC totes are available
A 55-gallon rain barrel costs $30–$100 and gives you 55 gallons. A used 275-gallon IBC tote costs $50–$150 and gives you five times the storage. For emergency preparedness purposes, 55 gallons is not a meaningful supply — it is 8–12 hours of household non-potable use. IBC totes are better in almost every way for families serious about water security.
3. No overflow management
A 1,500 sq ft roof generates 790 gallons from a single 1-inch rainstorm. If your storage is 330 gallons and has no overflow outlet, the excess water has nowhere to go except over the sides of the tote and against your foundation. Overflow pipes are not optional — size them to handle your maximum expected rainfall rate and direct them to a drainage area at least 6 feet from the house.
4. Ignoring algae in transparent totes
Clear or translucent IBC totes allow sunlight to penetrate, which promotes algae growth. Paint the outside of clear totes with dark paint (opaque black or dark green), wrap them with a tarp, or build a simple shade cover. Algae is not a health crisis in non-potable water storage, but it clogs screens and degrades water quality over time.
5. Not testing the water before drinking it
If you plan to use rainwater for drinking even occasionally, test it first. A basic water test kit ($30–$80 at hardware stores or online) checks for coliform bacteria and common contaminants. If you are on an asphalt shingle roof, test specifically for zinc and other metals. Do this before drinking the water, not after.
FAQ
How much does a basic rainwater collection system cost?
A functional system with meaningful capacity for a family of 4: two used IBC totes ($100–$300), a first flush diverter ($30–$80), downspout hardware and screen material ($30–$50) = $160–$430 total. A single 55-gallon rain barrel from a garden center costs $30–$80 but stores almost nothing useful for emergency purposes. The IBC tote approach gives you 10× the storage at 2–3× the cost.
Can I use rainwater to flush my toilets during a water outage?
Yes, and this is one of the most practical uses during an emergency. An average toilet uses 1.6–3.5 gallons per flush. A family of 4 flushes roughly 20–24 times per day = 32–84 gallons. A 275-gallon IBC tote gives you 3–8 days of toilet flushing with no treatment required. To fill the tank, simply pour collected water directly into the toilet tank (not the bowl) to refill it for each flush. No pump needed.
Is it safe to water vegetables with collected rainwater?
Yes for most food crops, with one exception: avoid using roof runoff collected from asphalt shingles or surfaces that may have lead-based paint on edible parts of plants (leaves, fruit) due to trace zinc and organic compounds. Rainwater collected from metal or tile roofs is generally very clean and excellent for all garden use. For root vegetables and leafy greens from asphalt-shingle roofs, use filtered water or municipal water as a precaution.
How do I keep my rainwater system from becoming a mosquito breeding ground?
Screen every opening with fine mesh (⅛” or smaller). Inspect screens monthly and after storms — a single pinhole is enough for a mosquito to enter. If you suspect mosquitoes have already bred inside a tank, add Bti (Bacillus thuringiensis israelensis) dunks — the same biological control used in ornamental ponds. One dunk per 100 gallons treats water for 30 days and is safe for plants, animals, and humans. Bti kills mosquito larvae specifically without affecting other organisms.
Bottom Line
A basic rainwater collection system — two used IBC totes, a first flush diverter, screens, and an overflow outlet — costs $200–$400 and can be installed in a weekend. For a family of 4, it provides a genuine emergency water buffer and year-round utility: garden irrigation, toilet flushing during outages, and a supply that keeps working when the municipal system does not.
Check your state rules first, then buy two IBC totes. Everything else follows from there.